By following this guide, you will know some of the methods to open Windows Defender settings in Windows 10. We will also see how to how to turn on, turn off, enable, disable, open, configure & use Windows Defender.
Windows Defender in Windows 10
The user interface of Windows Defender is something you may have already seen in earlier versions of Windows. You have the Home tab, the Update tab, and the History tab. The Home tab shows you the PC status and offers Scan options. The Update tab is where you can manually update Defender. Under History, you can view the items that were detected as malware and quarantined or deleted. To open Windows Defender settings, you can follow any of these methods.
1] From Windows Defender UI
You can open the Windows Defender Settings panel from the UI itself. Press Win+X menu, open Control Panel, and select Windows Defender. Here you can click on the Settings link to access it.
2] From Settings App of Windows 10
Press Win+I to open the Settings app. Next, click Update & Security and then Windows Defender in the left panel.
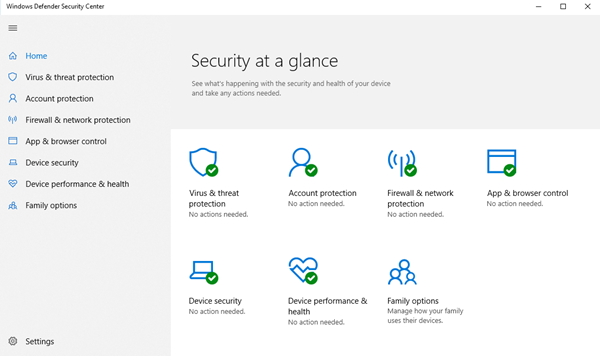
3] Using Taskbar Search
The Search bar can also help you to open the Windows Defender settings panel directly. Just type Defender in Taskbar search box and click on the result. You will see Windows Security. Windows Defender settings look like this:
Configure Windows Defender in Windows 10
Here in the Windows Defender Settings app, you will be able to configure the following options:
Turn On/Off Limited Periodic ScanningTurn On/Off Real-Time protectionTurn On/Off Cloud-based ProtectionTurn Of/Off Sample submissionAdd Exclusions to scanTurn On/Off Enhanced NotificationsConduct an Offline Scan.
In Windows 10, Windows Defender gets Cloud Protection. This feature sends Microsoft information, based on which it may develop new anti-malware signatures to better deal with malware identification and removal. Finally, towards the end, you see Version info. Clicking on the Use Windows Defender link at the bottom will open the Windows Defender UI. If you do not want to let Windows Defender scans your specific files, folders, file types, or process, you can put that on the Exclusion list. To add anything to the Exclusion List, just click on Add an exclusion under Exclusions and add your file, folder, file type, or process.
Once you have done the basics, you can go on to harden Windows Defender protection to the highest levels on Windows 10 by changing a few Group Policy settings. Windows Defender in Windows 10 also adds the ability to Turn On/Off Limited Periodic Scanning, Turn On/Off Enhanced Notifications and carry out a Windows Defender boot-time scan. If you use Windows 10, you want to be familiar with this new Windows Defender settings app. Incidentally, Windows Server 10 will include Windows Defender. See how you can make Windows Defender protect you against Potentially Unwanted Programs too. Some of these posts are sure to interest you too: