OneDrive Files On-Demand in Windows 11/10
On turning on Files On-Demand, you will have all your files in the File Explorer. You will also get new info about every file. The files you create online or on some device other than the one you are accessing them from, will not take any storage space on the device. With an active internet connection, you can access and edit every file as if they were on the device. All changes will be saved, they can even be shared, but they won’t take up any hard disk space. The only files that will take up hard disk space are obviously, only the ones you created or downloaded on the device.
How to enable OneDrive Files On-Demand
You may or may not have Files On-Demand active on your Windows PC. Here is how to turn on OneDrive Files On-Demand if it isn’t already enabled.
1] Sign in to OneDrive on the device from which you want to access Files On-Demand. 2] Check the right side of the taskbar to find the notification area and right-click the OneDrive cloud icon. It will be a white or blue icon. If it is not in the notification area, see if it comes in the ‘Show hidden icons’ section. If it is not even there, OneDrive isn’t running. You will need to type ‘OneDrive’ in the search bar to access it. Once you have launched OneDrive, proceed to the next step. 3] Go to ‘Settings’ tab. 4] You will find the ‘Save space and download files as you use them’ box in the Settings tab. Select it and click OK. This way you would have enabled the Files On-Drive feature to use files without downloading them while the internet is on and have the option to download them for offline mode as well.
Cannot find OneDrive Files On-Demand
If you can’t find the Files On-Demand option even after installing OneDrive, it is because: Following these steps will ensure Files On-Demand is available for use. Files On-Demand settings are saved device-wise and not account-wise. So you will need to do this on every device you want to access your OneDrive Files On-Demand from.
Mark files for offline or online use in OneDrive Files On-Demand
With OneDrive Files On-Demand you can choose to use some files or folders online only and some in offline mode as well. That means you have the option to download some and keep some on the Cloud alone. This is how you can do it:
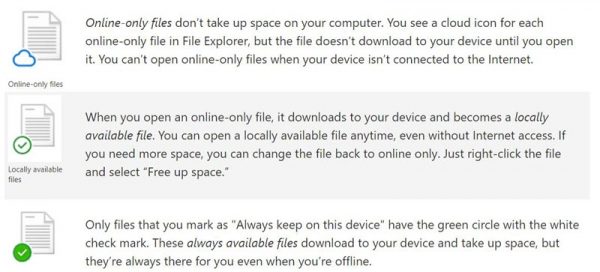
With the ‘Always keep on this device’ option, new files and folders will be downloaded and saved on the device for offline use. Even an ‘online-only’ folder can have individual files that are always available.
Hide a folder on OneDrive
Here’s how to hide your personal files and folders on OneDrive:
How to sign into OneDrive
When you add a new account or download OneDrive for the first time on your desktop, you will need to sign in. Here’s how:
OneDrive Files On-Demand Quick facts
Here are some quick facts that you might want to know about OneDrive: 1] Deleting an online-only file through the device used to log into OneDrive will result in deleting the file forever and from everywhere. It will no more be available on the cloud storage. 2] You can restore one such deleted file or folder from the OneDrive recycle bin within 30 days from deletion. The OneDrive recycle bin is the place you look for accidentally deleted files and folders. 3] Deleting a locally available file will result in the file moving to the recycle bin of the device. From there it can be restored through regular recycle bin restoring ways. 4] Changing a file to ‘online-only’ doesn’t delete a file. It just removes it from all devices. You will be able to access it from any device with which you sign into OneDrive. 5] You can also use desktop search for OneDrive files. However, for the ‘online-only’ files, you will need to search within the Drive. They aren’t recorded on the device. 6] Windows might automatically start downloading files for various apps on your device. If you do not want that, you can immediately ‘Cancel download’ and then follow through with ‘Block app’. 7] Avoid blocking apps you often use OneDrive files with. Trust only known apps. 8] To unblock an app you can go to ‘Settings’ followed by ‘Privacy’ followed by ‘Automatic file downloads’. You will figure out what to do. Now that you know almost everything about the Windows Files On-Demand, you can get started.